Rainbow Cake Roll filled with Rainbow Chip Frosting
This St. Patrick’s Day enjoy a slice of brightly colored Rainbow Cake Roll filled with Rainbow Chip Frosting instead of searching for that elusive pot of gold.
It’s very unlikely you will find a pot of gold at the end of the rainbow, but you can find a sense of satisfaction by indulging in a sweet treat like this brightly colored striped cake roll.
I know it’s not the same, but eating sweets always makes me feel prosperous.
It’s hard to imagine life without cake or cookies or pie or ice cream or candy. If I had to chose a life without them over a pot of gold, I’d choose dessert.
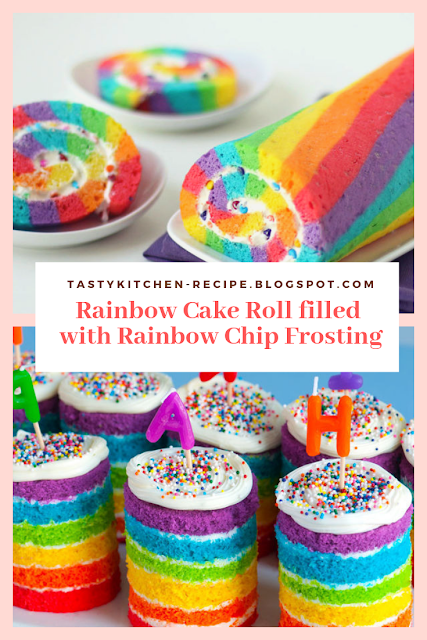
Not sure if you’ve ever had the pleasure of experiencing the tub of miracles otherwise known as rainbow chip frosting. It’s a tangy-sweet, but mostly sweet, vanilla frosting that has soft and colorful chips swirled inside. If unicorns and leprechauns owned a bakery together, rainbow chip frosting is what they would sell.
But in real life, it’s sold in the baking aisle. I understand some of you may completely despise rainbow chip frosting and if you are one of those people, come back on Wednesday when I share a brownie cookie brownie chocolate chip pie concoction I whipped up recently. But, then again, maybe you won’t despise the homemade version which– and I may be biased here– tastes 1,098x better than the canned version.
I’m getting pretty good at making cake rolls being I’ve made several for my gig over at Tablespoon.com. They look so simple, yet can be challenging to make without cracking. What I’ve learned is that the cake can crack a little as long as that crack get’s rolled up inside and wont show.

So, I worry a lot less now when I make these types of cakes.
This is my favorite cake roll creation to date and everyone who enjoyed a slice loved the bright stripes of color throughout the cake.
It’s the perfect cake to serve for St. Patrick’s Day, but would also be fun for Easter or a birthday celebration.
Ingredients
Instructions
It’s very unlikely you will find a pot of gold at the end of the rainbow, but you can find a sense of satisfaction by indulging in a sweet treat like this brightly colored striped cake roll.
I know it’s not the same, but eating sweets always makes me feel prosperous.
It’s hard to imagine life without cake or cookies or pie or ice cream or candy. If I had to chose a life without them over a pot of gold, I’d choose dessert.

Not sure if you’ve ever had the pleasure of experiencing the tub of miracles otherwise known as rainbow chip frosting. It’s a tangy-sweet, but mostly sweet, vanilla frosting that has soft and colorful chips swirled inside. If unicorns and leprechauns owned a bakery together, rainbow chip frosting is what they would sell.
But in real life, it’s sold in the baking aisle. I understand some of you may completely despise rainbow chip frosting and if you are one of those people, come back on Wednesday when I share a brownie cookie brownie chocolate chip pie concoction I whipped up recently. But, then again, maybe you won’t despise the homemade version which– and I may be biased here– tastes 1,098x better than the canned version.
I’m getting pretty good at making cake rolls being I’ve made several for my gig over at Tablespoon.com. They look so simple, yet can be challenging to make without cracking. What I’ve learned is that the cake can crack a little as long as that crack get’s rolled up inside and wont show.

So, I worry a lot less now when I make these types of cakes.
This is my favorite cake roll creation to date and everyone who enjoyed a slice loved the bright stripes of color throughout the cake.
It’s the perfect cake to serve for St. Patrick’s Day, but would also be fun for Easter or a birthday celebration.
Ingredients
- 6 ounces white chocolate, coarsely chopped
- food coloring: any four colors of your choice
- 3/4 cup butter, softened to room temperature
- 4 ounces cream cheese, softened to room temperature
- 4 cups powdered sugar
- 1 1/2 teaspoons vanilla
- pinch of salt
Instructions
- Before beginning to melt the white chocolate, prep everything you need by pulling out a silicone baking mat or lining a baking sheet with parchment and grabbing 4 small bowls, 4 spoons, and the food coloring you plan to use to color the white chocolate.
- Melt the white chocolate in a double boiler or a glass bowl set over a half-full pan of very hot, but not boiling, water. Alternatively, you can microwave the white chocolate, stopping to stir every 20 seconds, until melted.
- As soon as the chocolate is melted, divide it between the 4 small bowls and stir 2-3 drops of food coloring into each bowl. More food coloring may cause the white chocolate to seize up, so be cautious adding more. Spread the colored white chocolate into 4 small rectangles on the silicone baking mat or parchment paper, then refrigerate for 15 minutes.
- Meanwhile, prepare the frosting base by beating the butter and cream cheese together on high speed in a large bowl using a handheld mixer or stand mixer with a whisk attachment until smooth and creamy, about 3 minutes. Add the powdered sugar, 1 cup at a time and mixing at low speed until combined before adding the next cup. Beat in the vanilla and a pinch of salt and beat the frosting base until creamy.
- Once set, remove the white chocolate from the refrigerator. Transfer the colored rectangles to a cutting board and chop into tiny squares to make little chips. Using a rubber spatula, fold the chips into the frosting base, adding just 1/3 of the chips at a time to ensure even distribution.
- Frost your favorite cake or cupcakes and store any leftover frosting in the refrigerator. Just let it come to room temperature before using.